1. Phone overview

| 1 | LED display Missed call / new voicemail / low battery. The LED behavior can be configured in the settings. |
| 2 | Volume up/down button (on the side panel) |
| 3 | Mute button (on the side panel) |
| 4 |
soft keys Select different options that will appear in the lower part of the screen. From idle state to access the Contacts / Central Directory / Calls menu. |
| 5 | speaker button |
| 6 | Confirm/Select button |
| 7 | Pickup/Answer key |
| 8th | Voicemail button (long press) |
| 9 | Key lock (long press) |
| 10 | emergency button |
| 11 | Headset jack (3.5 mm) (on the side panel) |
| 12 | Pull cable socket (on the side panel) |
| 13 | navigation keys |
| 14 | menu button |
| 15 | Hang up/Hang up button/Back button |
| 16 | Silent mode button (long press) When activated, no tones are played on the handset. |
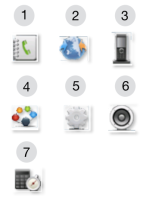
2. The main menu

| 1 | Contacts: local phone book |
| 2 | Central directory: Online access to the shared phone books of the PBX |
| 3 | Calls: call log |
| 4 | Connectivity: Register/deregister handset |
| 5 | Settings: Personal handset settings |
| 6 | audio settings |
| 7 | Alarms: alarm clock / wake-up call setting |
3. Register the handset on the W-Air base
- Go to the connectivity menu
- Choose Register
- Choose an empty seat
- Enter PIN (0000 by default)
- Press OK
4. Deregistering the handset from the W-Air base
- Go to the connectivity menu
- Choose Sign out
- Enter the access code and confirm with Yes
5. Assign users
- Press the red end call key to turn on the phone
- Wait until the signal is found and the phone screen shows "login_x", "unknown_x".
- Dial 99 and press the green talk button
- Follow the audio instructions to enter your extension number and password
- Press 1 when prompted to use this phone